Wednesday, April 24, 2013

A Home For Bugs!


This year we will be participating in the Children's Museums Bug Festival! Kids love to draw bugs or insects of any kind so creating a fun project for all ages was easy. Along with lots of other wonderful activities, kids will make their very own bug jars. For those who won't be able to make it out to the festival, here's a similar project you can do at home!


Bug Jars!


Materials:

Bug Drawing Sheet


Jar Drawing Sheet


Practice Paper
Pencil
Bristol Paper
Oil Pastels
Blue and Green Acrylic Paint
Watered down Blue and Green Acrylic Paint
Brushes
Brown and Green Construction Paper
Scrap Craft Paper
Scissors
Glue


Step 1

Practice drawing bugs and jar. Then draw a big jar on bristol paper, making sure to fill up most of the page. You'll want a roomy home for your bugs to live in!


Step 2

Paint all around your jar with blue acrylic paint. Next using the green paint, add brushstrokes along the bottom of the page to create grass. Once dry (hair dryers help with drying time) paint inside the jar with watered down blue acrylic paint and along the bottom of the jar with watered down green acrylic paint. The watered down acrylic paint is lighter giving the jar a see through appearance.


Step 3

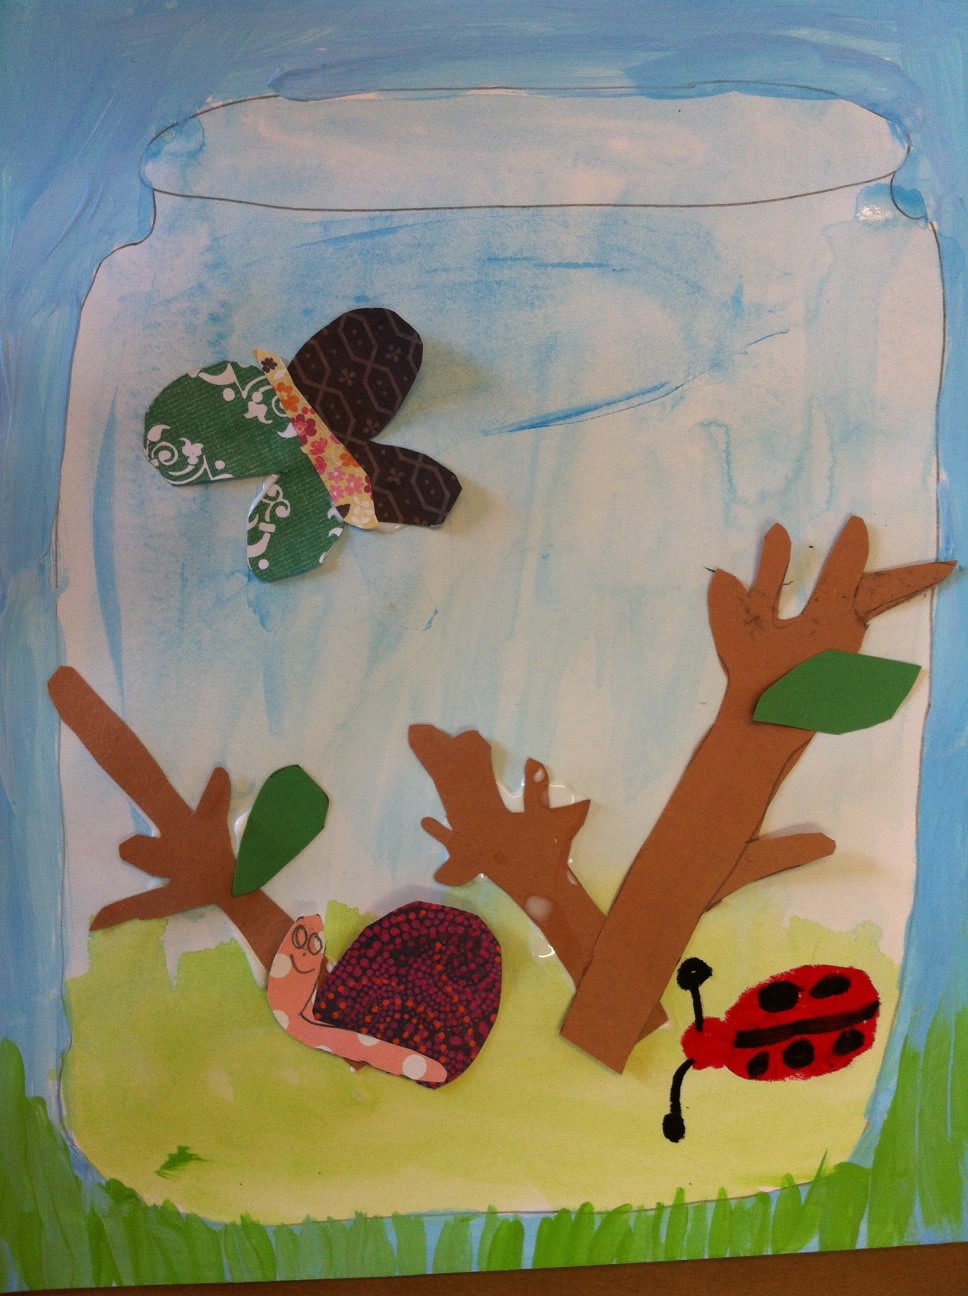
Next, use brown construction paper to create twigs for your bugs to crawl along and green construction paper to create leaves. Glue down and start drawing bugs inside your happy habitat!


Step 4

There's a couple of different ways to color in bugs once drawn. You can use oil pastels or create wings, etc. out of scrap craft paper, or a mixture of both. Either way works well and you're sure to love your little home for bugs!


Friday, April 5, 2013

Spring Flowers!


It seems Spring has finally arrived! To celebrate we did a colorful flower project! I did this project with both my Folk Art class and Creative Kin class (ages 4-8). It's a fun, expressive project that works for younger and older students.


Materials:

Drawing paper or cardstock (computer paper works as long as you skip the watered down acrylic step)
Oil Pastels
Yellow Acrylic Paint (watered down)
Black Crayon or Pencil
Scissors
Glue
Bristol Paper
Cream, Purple, Green, Yellow, Orange, and Pink Acrylic Paint
Brushes
Piece of cut up sponge
Patterned Craft Paper (again, computer paper works as long as you decorate)

Step 1

This project is more of a painting project than drawing project. To start, scribble all over a piece of drawing paper with different color oil pastels. The more color the better! If using drawing paper or cardstock (slightly thicker than computer paper and able to take a wet medium) paint over oil pastel. The paint should tint the paper and fill in any white spots.


Step 2

Next, paint your background. Draw a line about a third up the page. Paint above the line with cream paint and underneath the line with purple paint. Place to the side to dry!


Step 3

Draw large, medium, and small circles on the back of your oil pastel paper and cut out. These will be the center of your flowers. Next create your vase! Pick a piece of patterned craft paper and fold in half. Making sure you are drawing along the folded side, draw half your vase shape (for younger kids, drawing a large number seven can be helpful) and cut out making sure to keep paper folded. Unfold paper to find your vase shape.


Step 4

Time to put it all together and paint your flowers! Glue vase and flower centers onto background (making sure not to overlap flower centers). To create flower petals, start with yellow paint, making short brushstrokes that surround the flower center. Follow with orange paint, finishing with pink.
Sponge in a few leaves using green paint and enjoy your beautiful spring flowers!